The experience of a 3D pdf depends strongly on its performance in fps. To make sure the scene runs fine on lower spec systems, I used the good old nvidia Geforce TI4200/64mb as reference, which runs scenes up to 130.000 polygons fine. The texture size for baked images on this card should be 1024x1024, and it can handle up to 12 of them (and maybe more).
Newer graphics cards from the Geforce 8 series on, runs the same amount of images at 2048x2048 with acceptable fps. Importing scenes in several steps (biggest objects first), by using the 3D Toolkit to merge your objects, can prevent heavy performance problems too. Additionally you can improve performance by lowering Values at importing in the "optimize" tab (Acrobat 9), or using the 3D toolkit (Acrobat 8). I personally prefer the 3D Toolkit method, because it gives you a high quality sample, which you can reduce to more compressed versions incrementally. To do so, right click inside Acrobat on your 3D scene (Annotation) and choose "edit in 3D toolkit". In 3D Toolkit change an unimportant value (like scene material specular highlight) and exit the toolkit by closing the window. Because of the change of a value, the 3D toolkit has a reason to ask you to save the changes on exit.
The Game and the CAD button define presets for the mesh compression. The Game button does a good job in most cases. A further reduction of mesh accuracy does not deliver significant changes regarding the filesize and 3D performance, but may cause visible errors. Additionally you can reduce the file size by lowering the JPG compression value. The more grainy your Texture Maps are, the more you can reduce that value. The more gradient the higher should be this value. Keep in mind that Texture Maps with alpha channel (tiff, png, tga) are not considered by the Texture Compression.
Update:
Acrobat users, using Deep Exploration to get their objects into pdf will have the same Export Dialog as in 3D Toolkit, and maybe some more possibilities for optimisations, but at this moment I can't go more deeply into that, because I don't have Deep Exploration yet to figure out.
Finally you can reduce the file size additionally by using the pdf optimizer for saving your pdf.
What it actually does, is it removes unused resources that sometimes blow up the file size of your pdf, and compresses the poster image of your 3D Annotation by the given compression rate.
Saturday, January 10, 2009
Thursday, January 8, 2009
Acrobat 9
Acrobat 9 brings some changes that makes it harder to make textured objects work inside pdf.
On the other hand it has some nice new features like text and graphics over 3D background, even semi transparent ones, that gives you complete new possibilities on creating interfaces for interacting with your objects.
Major worsenings from Acrobat 8 to Acrobat 9:
-no .ase filesupport
-no .rh filesupport
-3D Toolkit (Deep Exploration "light") replaced by 3D Reviewer (homegrown 3D Toolkit without texture support)
Workaround:
1. Export your 3ds max scenes/objects as .rh (Right Hemisphere)
2. Open the file in Right Hemisphere's Deep Exploration, and save it as .u3d file
3. Import the .u3d file into Acrobat 9
Monday, January 5, 2009
Opacity Bug Workaround
The bad news is, there is no way to avoid the Opacity Bug. But because the Opacity Bug only appears on the frontside of a polygon, you can try to reduce the ammount of appearence, by flipping the polygons backwards the statisticly most seen viewing angles. Examples to study on how the Opacity Bug behaves, are my first vegetation attempts Vegetation Test (2.3mb)* and Island (4.8mb)*.
Additionally you can reduce the effect by avoiding semi transparent pixels, and using a higher resolution than absolutely neccessary to some extend. You also can try to receive better results by splitting large amounts of opacity planes into several objects, because exporting/importing the normals behaves more stable on smaller objects (.ase). If you want to use opacity maps in combination with Diffuse Color, Bump and Reflection maps, for example for water, you have to import the opacity map as separate greyscale image, not as .tiff with alpha channel you normally prefer. My best results for simulation of vegetation inside 3Dpdf so far, can be seen in the
Guggenheim New York Scene (5.0mb)*.
For scattering the image planes I used Gugila Groundwiz with a streched Sphere as scatterobject, and turned the normals so they show inwards the tree. Not topic related but important to mention, that the sky map which is used in this scene comes from CGTextures.com, and most of the building textures from Google Earth Street View.
*The bandwidth is kindly offered by: active-servers
Update:
Keep in mind that you have to set the render mode to double sided in the 3D settings.
To make sure the document renders double sided regardless the local machine configuration, attach the following line to your Javaskript:
scene.renderDoubleSided=1;
Optimisations I - Texture Map Processing
The more complex your objects get, the more you will realize that you quickly run out of space on your Baked Map.
One reason for that is, that there is no possibility to map the Diffuse Color Texture independently from the Self Illumination (Emissive) Map, as mentioned in my Texture Baking Tutorial. This means that repeating color information such as tiled Texture Maps, have to be stored over and over again, for every face of your Model uniquely. In result of this fact it also means that you are heavily restricted the Level of Detail, that you can achieve on your Diffuse Color Texture.
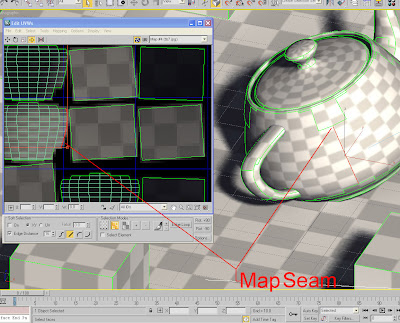
It means also, the more complex your models get, the less pixelinformation per face you have, which again may result in distortions and undesired blurring effects along the Map Seams. Map Seams are basicly open edges in UV Space.
As you can see in the image above, Map Seams are always adjacend to the dark void of the Backround Color. So on low texture resolutions and/or zooming out in your 3D model inside 3Dpdf, it may happen that the Background Color mixes/blurs with the actual pixelinformation of your face. In other words: Approximation inaccuracies for performance gains.
To avoid this problem we have to somehow "duplicate" the edge pixels of the faces. I will explain the neccessary Texture Map Processing by using Adobe Photoshop:
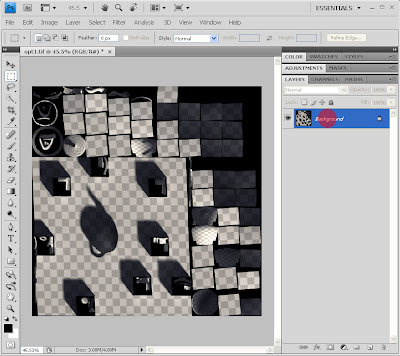
After rendering your Baked Map save your image for example as .tiff image file with alpha map, or any other file format with alpha map support.
After opening the Baked Map in Photoshop double click on the Background Layer, so it creates a new Layer (Layer0) that you can apply a Layer Mask to.
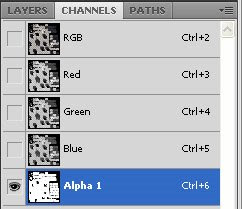
Copy the complete alpha channel 1...
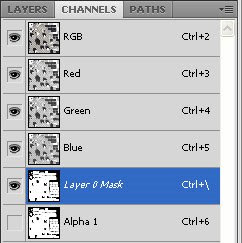
to a new Layer Mask...
paste the copied alpha channel into Layer 0 Mask...
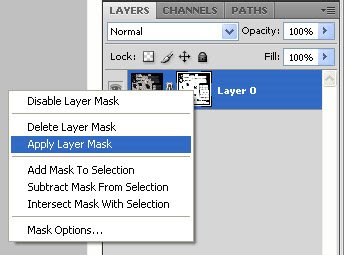
...and apply it.
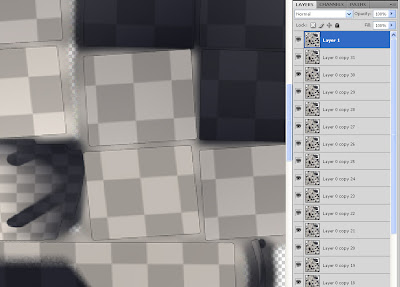
Now duplicate Layer 0, call it Layer 1, and apply Gaussian Blur with a value of 6 px to Layer 0, and duplicate Layer 0 over and over again.
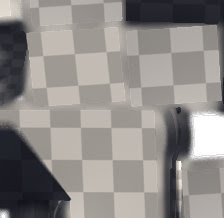
You might notice the little hard edge between the polygon texture and the blurry background, which results from the Anti Aliasing between the polygon texture and the black background.
To get rid of that select all black pixels of Layer 1/Channel alpha 1, expand your selection by one pixel, and delete your selection in Layer 1.
Now you can save your image for example as .jpg image file, the alpha channel is no longer needed. This procedure also comes handy, if you want to downsize your Baked Maps for graphics cards with lower amount of video memory. Because you have to go through this procedure over and over again, I recommend to create a Droplet for that work.
Sunday, January 4, 2009
Supported 3D Features
Because 3Dpdf's features are mainly directed to the documentation of engineering and scientific researches, its capabilities and performance for realtime 3D visualizations are quite poor in compare to other 3D engines like Quest 3D or high end game engines. However, small file sizes and the wide spread of the Adobe Reader, makes it very attractive to develop realtime 3D graphics for 3Dpdf. Using .rh export module from Right Hemisphere gives you the most compatible exchange format between 3ds max and Acrobat 3D, but in some cases you might prefer to use the .ase format (Acrobat 3D 8.12 and lower).
Features:
Materials, Maps:
-Diffuse Color (Texture Map)
-Emmissive, Self Illumination Color (Texture Map)
-Opacity (Texture Map, .tiff with alpha channel in Diffuse Color and greyscale image)
-BumpMap (Texture Map, by Javascript - for more information visit Grayson's Bump Map Tutorial)
-Reflection Map (Spherical Environment Map)
-Multi Subobject Material and Material ID's (.rh)
-Specular Highlight Level
-Specular Highlight Phong Exponent
-Specular Highlight Color
Geometry, Objects:
-Object Instances
-Smoothing Groups
-Keyframe Animation
-Light Sources
-UV Coordinates (UV Map Channel 1)
-Vertex Colors (Darken on Diffuse Color)
-Object Opacity
-Splines (Colors by using dxf/dwg)
Edit:
-Cameras (Target Camera, animation will not be considered in pdf)
To see examples how these features could be used, visit our web page
Saturday, January 3, 2009
Texture Baking - Export - Import
Texture Baking
Texture baking is neccessary to store the light and shadow information out of your light simulation in an image file, that can be used inside 3Dpdf as texture map. Therefore we have to bake the Complete Map (for Vray users I suggest Vray Complete Map ) into UV Map Channel 1, because other UV Map Channels than 1 are not supported by 3Dpdf. This means first, that we cannot store the light information separately from the Diffuse Color texture that could be tiled, and second, that we have to define a unique space in UV Space for each polygon on our model. To do so I discuss the following steps on a simple example. A plane with some extruded faces and a teapot attached to one object, as Editable Mesh or Editable poly with Checker Texture, light, shadows and Global Illumination .
Once the model with texturing and lightning is done, you have to assign an Unwrap UVW modifier to your object, and set its UV Map Channel to something else than 1. Beacause UV Map Channel 1 is used by default for Texture Maps such as Diffuse Maps etc., and it is not recommended to bake into the same UV Channel that is already used by texture maps on your object. So lets say you choose UV Map Channel 1 for your texture map(default), and UV Map Channel 3 for baking your textures, so there will be no confusion between the Texture Maps that are going to be baked and the Baked Maps, which are the final image results that we are going to export to 3Dpdf. Inside the Unwrap UVW modifier dialog click on edit, and a new window opens, where you can modify the UV coordinates of your object. Use the selection mode Face and ctrl+A to select all faces.
Now go to Mapping then Flatten Mapping and change the Spacing value to 0.002, and accept with ok. The result should look something like this:
What the Flatten Mapping procedure did, was arranging the Faces without overlapping (hopefully) with the Spacing we defined. A Spacing value of 0.002 is fine in most cases, but if you have lots of triangles you may have to increase that value, to prevent overlapping. Back in the Unwrap UVW dialog save your UV's so you can later load them into UV Map Channel 1. Select the object you want to bake and open the Render To Texture dialog (shortcut: 0), and check the following settings, so the renderer renders the color information into the polygons according their positions :
Under Output click on Add, and select Complete Map (Vray Complete in my case), and set the resolution to 1024x1024.
Click on render, and save your image which is the Baked Texture for example as .jpg
Import
To import the object to Acrobat 3D, I use V 8.12 for reasons I will discuss later, go to "create from file", and choose the .rh file to import. Now you can play around with the settings to define the appearance pleasing your desires.
Click here to view the result
The bandwidth is kindly offered by: active-servers
Texture baking is neccessary to store the light and shadow information out of your light simulation in an image file, that can be used inside 3Dpdf as texture map. Therefore we have to bake the Complete Map (for Vray users I suggest Vray Complete Map ) into UV Map Channel 1, because other UV Map Channels than 1 are not supported by 3Dpdf. This means first, that we cannot store the light information separately from the Diffuse Color texture that could be tiled, and second, that we have to define a unique space in UV Space for each polygon on our model. To do so I discuss the following steps on a simple example. A plane with some extruded faces and a teapot attached to one object, as Editable Mesh or Editable poly with Checker Texture, light, shadows and Global Illumination .
Once the model with texturing and lightning is done, you have to assign an Unwrap UVW modifier to your object, and set its UV Map Channel to something else than 1. Beacause UV Map Channel 1 is used by default for Texture Maps such as Diffuse Maps etc., and it is not recommended to bake into the same UV Channel that is already used by texture maps on your object. So lets say you choose UV Map Channel 1 for your texture map(default), and UV Map Channel 3 for baking your textures, so there will be no confusion between the Texture Maps that are going to be baked and the Baked Maps, which are the final image results that we are going to export to 3Dpdf. Inside the Unwrap UVW modifier dialog click on edit, and a new window opens, where you can modify the UV coordinates of your object. Use the selection mode Face and ctrl+A to select all faces.
Now go to Mapping then Flatten Mapping and change the Spacing value to 0.002, and accept with ok. The result should look something like this:
What the Flatten Mapping procedure did, was arranging the Faces without overlapping (hopefully) with the Spacing we defined. A Spacing value of 0.002 is fine in most cases, but if you have lots of triangles you may have to increase that value, to prevent overlapping. Back in the Unwrap UVW dialog save your UV's so you can later load them into UV Map Channel 1. Select the object you want to bake and open the Render To Texture dialog (shortcut: 0), and check the following settings, so the renderer renders the color information into the polygons according their positions :
Under Output click on Add, and select Complete Map (Vray Complete in my case), and set the resolution to 1024x1024.
Click on render, and save your image which is the Baked Texture for example as .jpg
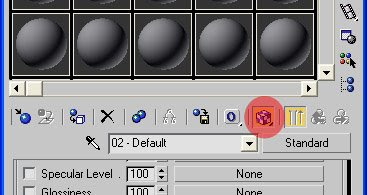
Now create a new Standard Material in the Material Editor and and assign the Baked Map to the Diffuse Map slot, set the Self Illumination to 100%, and assign the new material to your object. Finally change the UV Map Channel inside the Unwrap UVW modifier back to 1 (in older max versions you have to load the stored UV channel 3, which we saved previously, now). You may check if your Baked Map appears correctly in your viewport by pressing the "Checker Box Button" in the material editor.
Export
To export your object use the .rh export module by Right Hemisphere, and export it as .rh file including the Texture Maps.
Import
To import the object to Acrobat 3D, I use V 8.12 for reasons I will discuss later, go to "create from file", and choose the .rh file to import. Now you can play around with the settings to define the appearance pleasing your desires.
Click here to view the result
The bandwidth is kindly offered by: active-servers
Welcome
This blog intends to discuss the possibilities of creating 3Dpdf's from 3ds max for realtime 3D visualizations.
Our web page is: www.directlight.de
Subscribe to:
Posts (Atom)